Amateur radio, programming, electronics and other musings

All posts in Uncategorized

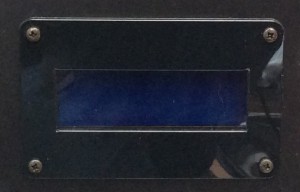
Whilst building the Thunderbolt Monitor I wanted to provide a clean, professional look to the LCD cutout. It is hard to cut out a very clean hole with crisp corners and straight edges from aluminium without a lot of patience and a lot of filing.

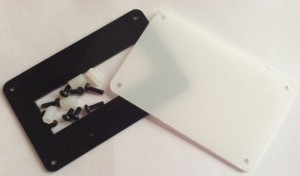
I designed a plastic bezel and glass using CAD and had a number professionally laser cut. The plastic is high gloss black.

I am now making them available for purchase with all the spacers and mounting screws you require to mount a 4×20 LCD to a panel.

The bezel and glass come with the plastic protective covering still attached to prevent scratches until you’re ready to install it.

They cost £4 with £1 delivery to the UK and £3 delivery to the rest of the world and are now available in the shop.

image

image

I’ve been selling these distribution boxes all over the world and have been really pleased with the interest. I decided I would build another one for myself for use with the 48v SSPAs I have. I uprated the resistors and the capacitors. Here is the finished result.

2014-05-16 21.37.22

2014-05-16 21.23.44

After having received the prototype enclosure back and being so pleased with it I thought getting the rest cut would be a doddle.  This didn’t turn out to be the case.  Having had the order accepted from the laser cutters and shipping off the boxes I later had them returned with an apology that they were unable to cut them after attempts to reproduce them had failed.  They found that the ABS was melting and catching fire and releasing Cyanide gas.

That meant that milling was the only viable option.  I found a number of local suppliers and contacted them for quotes.  Most claimed that no job was too small…  Out of the 5 I contacted, one returned my email.  The quoted a crazy price per box (£20) and couldn’t start for 6 weeks.  Somehow I don’t think they wanted the work.

I then found a number of suppliers on eBay.  I contacted a number of them and got 2 responses.  Having had a friendly telephone conversation with one of them and a reasonable quote I have shipped the boxes off to get machined.  They are very confident that they can machine them to the quality I require.

I am getting a large number of enquiries to purchase these and most people want more than one.  I’ll keep you all posted on progress.  I’m looking forward to getting this project finished once and for all.

I will also now be supplying a 40a fuse with each kit as the main input fuse.

I have received the prototype Powerpole Distribution enclosure back from the laser cutters and am very pleased with the results so I’ve sent off a large number of lids to be cut.

I’m hoping the I will receive them back in about a week or so at which point I will add the kit to the store. There will be fully built versions available too for those of you without the tools or time.

I’ve recently received interest in just the bare PCBs which is an interesting idea. I have invested heavily in the PCBs, components, Powerpoles and the laser cut enclosure which I need to clear first. I’ve had to purchase in bulk to make the kits cheap. If once the first batch of kits sell out there is enough interest in bare boards I may get another run of boards produced. The question I have is why you want to go to all the effort of sourcing the parts and cutting your own boxes?

I’ve learnt quite a bit whilst taking the idea and turning it into reality. I also now have contacts to make beautiful PCBs in large quantities and a local(ish) company with laser cutting skills. I’ve even had to learn basic CAD skills to ensure the job got done properly. All of the skills gained will come in handy for the next project for which I am already writing code and collecting components for a prototype. More on that soon.

20140131-225331.jpg

I look after the Swindon & District Amateur Radio Club website and during the last week parts of the site broke. The website is a WordPress framework with various plugins to add functionality. One of these plugins uses a Google Calendar to drive the programme page. This is the functionality which broke.

I got errors being displayed by the widget telling me that Google’s SSL certificate could not be verified. That sounds strange I thought, this is Google. I checked the “Chain of Trust” in my browser and all looked fine. I eventually noticed that Google had updated their certificate on 17th September and were effectively signing it themselves (Google Internet Authority G2) which in turn was signed by GeoTrust.

Researching further I found that Curl uses very old CA bundle which obviously didn’t contain references to the new CAs. Many people online were advising just to configure Curl not to verify the CAs. THIS IS A BAD MOVE – DO NOT FOLLOW THIS ADVICE.

To fix the problem, I downloaded a new bundle which is converted from the database Mozilla maintains. (http://curl.haxx.se/ca/cacert.pem) I stored this file in my PHP directory and added an entry in my php.ini file.

curl.cainfo = "C:\Program Files (x86)\PHP\v5.4\cacert.pem"

Restarted IIS and the problem was resolved.

Being a .NET developer, I could have done without the grief of using PHP but we are where we are.

Hope this helps someone.

Tonight I have been experimenting with custom characters on the 4×20 LCD.  I used a custom character when I defined the degree symbol on the Thunderbolt monitor.  As part of that I wanted to be able to have a screen which showed a large UTC clock.  Having decided that I could double the size by using characters covering a 2×2 character space I worked out that HH:MM:SS would occupy 14 chars.  3×3 would just have been possible as that would have taken exactly 20 chars.

My initial research told me that I can store up to 8 custom characters in the LCD with and write them out by referring to the byte address that they had been stored in.  I found a great site for helping out with the design to byte array translation. http://www.quinapalus.com/hd44780udg.html

I generated 4 custom characters and write them out to produce a zero.  I followed the same pattern to draw out a large one next to the zero.  When I ran the program all I saw was two large ones next to each other.  I found this weird.  I took out the code which wrote out  the second number and reran the program.  I got two ones as before.  I quickly realised that what was happening was as I was reinitialising the custom character it was updating it on the LCD.  This meant I was limited to only being able to display two different large numbers at a time.

Ultimately it means I have to either use a less pretty way of drawing numbers which only use a the 8 character spaces, use a different kind of display or scrap the idea of the large clock.  For the time being I’m going to scrap the idea…. unless someone has some code to donate which produces a nice looking clock.

Bummer!